Mazda AutoZam AZ-1 MazdaSpeed for sale
Mazda AutoZam AZ-1 MazdaSpeed version for sale, Houston,TX. $27k 47k kilometers 28k miles
email [email protected] for more information
Modifications:
MGM SARD ECU - Tuned
20 psi with boost controller
DEFI gauges (oil/coolant temps) With brand new sensors
Greddy EGT Gauge
Quick Release Steering wheel
SGS engineering Door struts
Titanium desert eagle full exhaust
Larger JDM aftermarket intercooler
Intake Pipe unknown JDM brand.
Rear Strut tower bar
Full coil overs all around
wheels / tires spaced and properly flared (paint matched)
Runs perfectly, very strong. No leaks, no issues.
Driven on 200+ mile trips never a hiccup.
Ridiculously fun vehicle. and much faster than a stock one.
AC is working
Compare to AZ-1s with more miles at Duncan Imports
120km/72kmiles for $25k
72km/43kmiles for $25.4
www.duncanimports.com/jdm-inventory.htm?search=az-1
120km/72kmiles for $25k
72km/43kmiles for $25.4
www.duncanimports.com/jdm-inventory.htm?search=az-1
Instructions on boost controls
greddy profec B. You can press the left side knob it should show you the different boost settings
please explain how to operate the boost controls in detail, which one to push to get the different boost settings
which button changes the boost?
the one on the right (analog dial) modifies O2 sensor voltage for AFR.
the one on the bottom left (2 analog dials, digital screen in middle) is boost controller
the one on top is the other piece of the boost controller
what is impact of changing voltage on O2 sensor?
which knob on boost controller changes boost?
changing it modifies AFR at idle and in closed loop. Can be necessary during racing to keep temps down, but overall not really needed to be done usually.
SBC instructions
https://www.yumpu.com/no/document/read/19834193/dual-sbc-spec-r-s-blitz
Dual SBC Spec R & S - Blitz
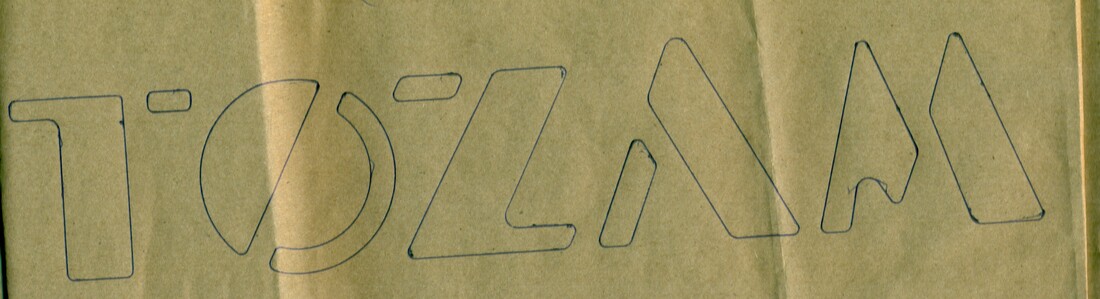
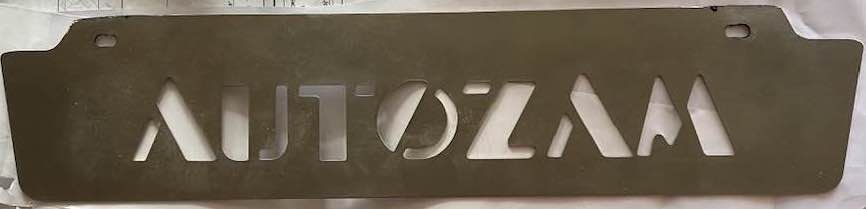
AZ-1 Valence
I have had an original valence traced and reproduced them in laser cut stainless steel. Running now a second batch of 10.
$85 delivered to USA
I have had an original valence traced and reproduced them in laser cut stainless steel. Running now a second batch of 10.
$85 delivered to USA
Right side rear wheel


Left side, rear wheel


Engine rear


Oil filter


Interior Under the driver's seat can be rusty, but this one is like new


Alright, let's talk AC compressors. I know I have teased the idea of a US based source for this and I've managed to come up with a solution. This does require you to be capable of disassembling and reassembling one of these, but you can buy the parts to rebuild yours yourself. So first things first, you will need to but two things off of amazon, a compressor for a Kubota tractor:
https://www.amazon.com/.../ref=ppx_yo_dt_b_asin_title_o00...
and also an AC compressor clutch bearing:
https://www.amazon.com/.../ref=ppx_yo_dt_b_asin_title_o01...(out of stock)
equivalent
https://bearingsdirect.com/ball-bearings/automotive-ac-ball-bearings/30bg04s8g-2ds-ac-compressor-ball-bearing-30x47x18/?gclid=CjwKCAjwv4SaBhBPEiwA9YzZvCr0BniWzgrGnqrVNpQRNRjHNtzbSkOmgscFBcLyIHTQJgxlZ2a6_hoC_XkQAvD_BwE
SO, the two compressors are not directly interchangeable, however the internal bits are functionally equivalent. All you'll need to do is swap the guts from one to the other. (One nice thing is the new compressor comes ready for 134a).
Open up your compressor by pulling off the clutch (one 10mm and a few snap rings), then removing the bolts on the front of the compressor. It should come apart and reveal the inner piece. This is the actual compressor. The outer shell is just that, a shell. It does not wear out and is almost certainly still usable. Do this to both compressors.
Now you may notice that the back of the compressors are not EXACTLY the same. The discharge ports are lightly different. They're ALMOST interchangeable, but the new compressor doesn't have all the bolt holes. DO NOT try to install the new compressor in your housing without swapping back plates and discharge vents or you will crack your housing (ask me how I know, I had to weld mine back together).
With both compressors side by side remove the back plates and discharge vents and swap them. I know that I'm telling you to use a wearable part in the new compressor but unless someone finds an alternative it's all I've got. A different brand of Kubota compressor may have different shapes, it may be worth a try but I'll leave that for someone else to try. Good news though, since it is a rotary vane style compressor, you're likely failure is stuck vanes like mine and the rear plate is still usable.
Anyways, after swapping rear plates its just a matter of reassembly. Be sure to use the o-rings and shaft seal from the new compressor. That way you're 134a compatible. Once you've reassembled your unit you're free to install the compressor clutch. If you are using the new clutch, the bearing that comes installed is too short and it won't fit right. The part listed above will make it fit like OE. Be sure not to loose any of the shims as you'll have to set the airgap according to the service manual (see the downloads section).
Overall it works great. A bit of a hassle in some sense, but heck, the connectors are correct so you can still use the thermal safety switch without splicing connectors, its now 134a compatible, it's readily available and ends up costing about $300 less than the JDM part. See pictures details. I didn't really take pictures for a whole write up as I was still figuring this out as I went, but maybe someone else who does this will do it for us when they build theirs. If anyone else has anything to add let me know in the comments. Cheers!
